Showing posts with label diy. Show all posts

May 28, 2017

Spring Home Tour: Basement Bedroom

hi! hope you're having a fab memorial day weekend! i'm so excited that we finally wrapped up our basement bedroom that i thought i'd give all of the details on this room redo asap. and bonus - so many of the items from this room are on sale this weekend.  here's what we were working with BEFORE:


i made a design board to give some focus to the project because i knew i'd need to execute it pretty quickly.


here's the after!


photo by kate renyi

photo by kate renyi

so here's the breakdown...what stayed: the wing chair, woven shades, and headboard (20% off). then i recycled some things from around the house that i already had like the vase and palm leaf, the navy pillows, and the white lamp. i added the wallpaper (20% off), dresser (also here), mirrorrug, nightstands, quilt (homegoods score!), duvet cover (15% off), flushmount light (size large), and of course the basket pendants. that flushmount is seriously one of my favorite things - we replaced the old builder nipple light and a small change made a huge impact.

the nightstands came with different hardware so i swapped out the knobs for matte gold ones which is an easy, inexpensive change that, again, has a big impact!

photo by kate renyi

the swimsuit art is by dorothy shain who is so talented. follow her on instagram if you don't already!

now let's talk about these pendants! in my original design board i included those gorgeous jeffrey alan marks pendants that go for $500 a pop. i'm in love with them but that wasn't in the budget. so one day i randomly came across rope wrapped electrical cord and a light went off (pun intended). i've had old ikea hardwire basket pendants (sadly no long available) sitting in storage forever - over 5 years - and if i could string the rope cord through them, then i would have exactly what i wanted. they were wired so i just removed the wire and socket.


the pendants were a light wood tone, similar to the mirror in this room, but i knew that wouldn't work with the rope. so down to the hardware store for a couple of cans of krylon matte white spray paint and voila, they're white! but stringing the cord through was much easier said than done and i couldn't even get the plug to fit through. so i started hacking away with a saw (i don't diy, this was the only tool i have!) to try to create a wider opening. it didn't work. at all. but then another light bulb - have the hardware store shave down the plug so it would fit! perfect, done, that worked. however not end of story because the rope had a knot at the end wouldn't fit through the hole. i mean come on!! so i texted my pal Jen from @chroniclesofhome and she, in about 7 seconds, fished the rope through and we were in business. it was more than slightly embarrassing.


then they sat for two weeks :) (please tell me i'm not the only one that happens to!) and finally yesterday mr. r hung them. that event has more detail than you would ever care to know but suffice it to say, we ended up using brass curtain rings to hold the rope up. actually worked like a charm and for about $75 i have the pendants that i really wanted.

shop the post: headboard (20% off) | palm leaf | navy pillows | white lamp | wallpaper (20% off) 
dresser (also here) | mirror (10% off) | rug | nightstands | quilt (homegoods score!) | 
duvet cover (15% off) | flushmount light (size large) | rope electrical cord

August 1, 2014

Bye Bye Red!

if you live with me then you better be ok with change! and my poor husband actually despises change (i like to think we balance each other out nicely!) so he was not exactly on board when i said i wanted to paint over the red stripes in our family room above the fireplace. but i needed something calmer (i feel like the red was secretly stressing me out) and something more modern. the red was feeling dated - already - it wasn't even up two years! so i went from this...


to this...


i started off with a roll of painters tape and got to work. this is where i'm very happy i had the red stripes professionally done because i just taped right above the red and automatically had very straight lines.


i decided to keep the white stripe the same color which is benjamin moore linen white. after taping, the first step is to paint over the tape seams with the white color to "seal" it so that the new color won't leak through. this is a little bit of extra effort but it works like a charm!


the new color is pale oak from benjamin moore and i looove it. i want to cover my whole house with this color. it's the perfect gray/taupe neutral. to save time i rolled on the new color with a small roller and used a small angled brush to get in the corners and on edges where the roller didn't cover. i ended up just needing two coats - i used the regal select line of paint and it was so thick, the coverage was incredible. i messed up once and started painting the white stripe instead of the red. duh!! but this was such a quick job - about 4 hours in total. and for those who are worried that i neglected my children for four hours, i started at nap time and then finished when i had a mommy's helper (girl from the neighborhood) come play with the boys.


only bad part is that the painters tape actually pulled up some of the paint on the white stripes when i took it off. not sure how to prevent that?


and meanwhile to my right while i was snapping these pics...two wild little boys!!


have a great weekend!

July 24, 2013

Gold Dipped Antlers

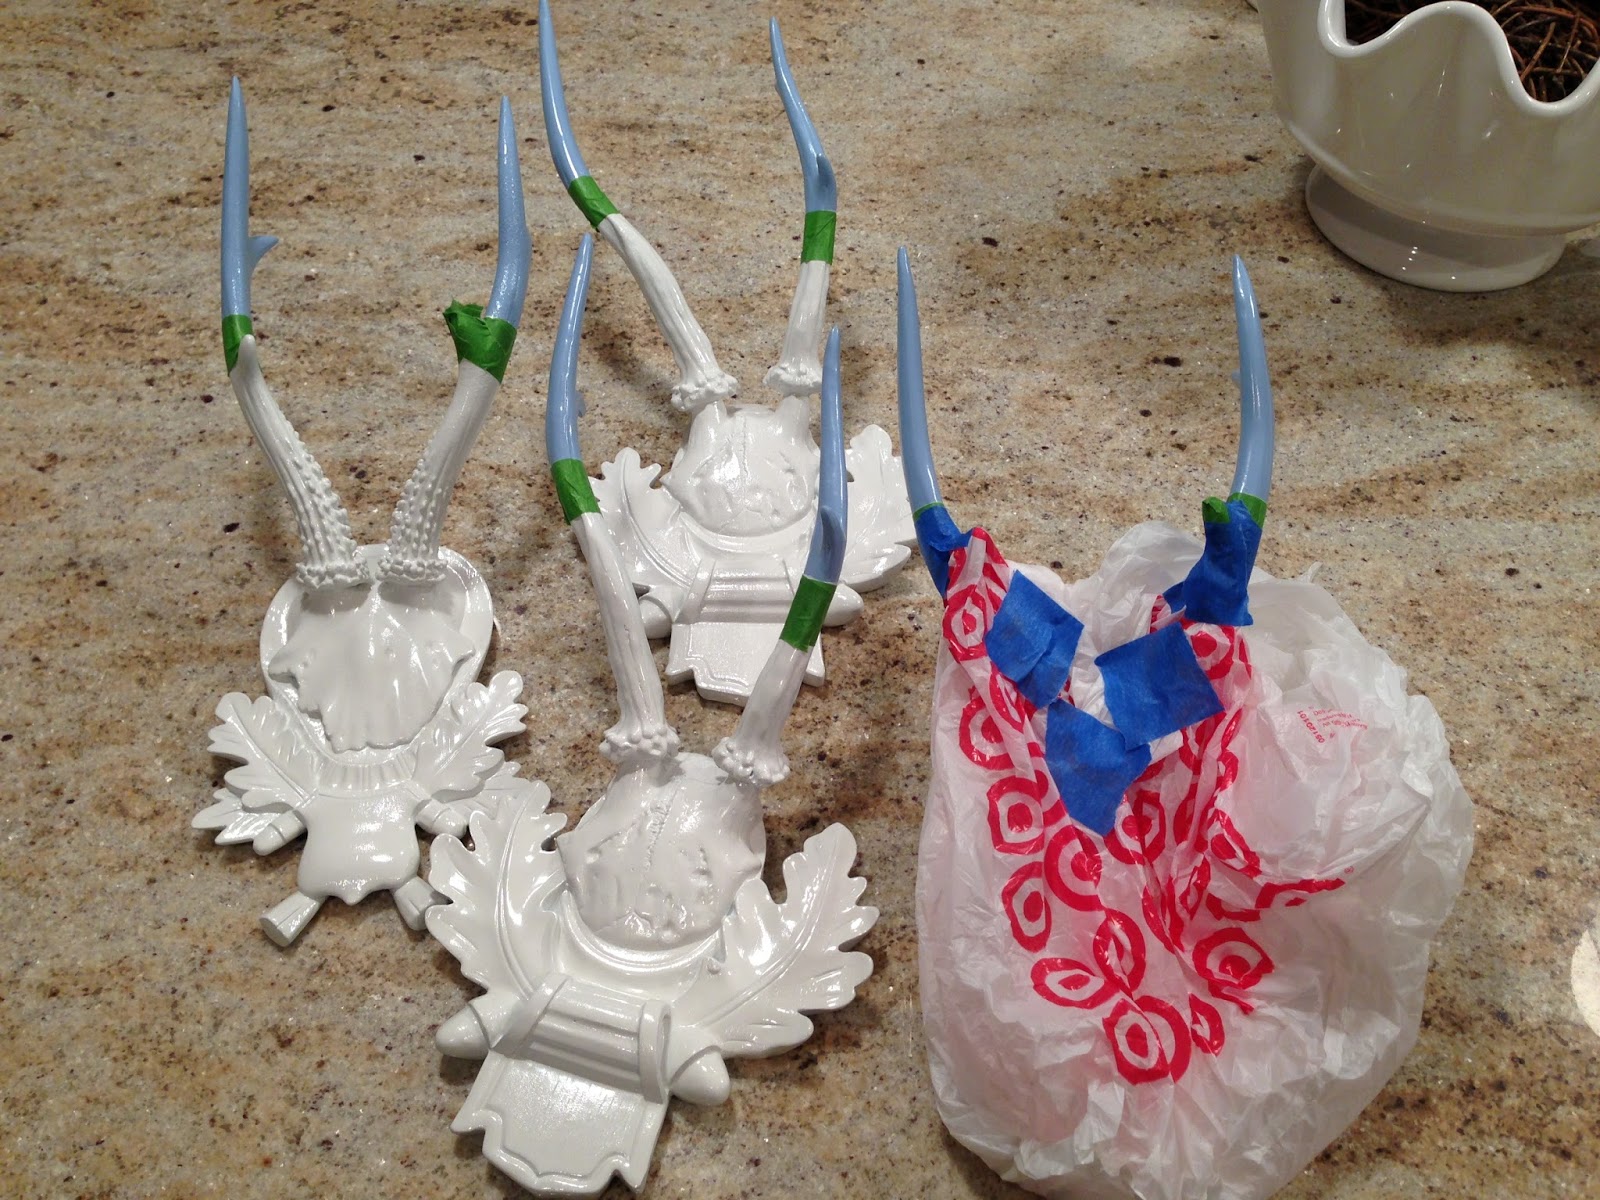
so as you may have seen from my post last week, gold dipping was one of the projects i've had going on. i started while on my break redoing the suzanne kasler for ballard antlers that i had painted blue a few years ago. i decided that they would look good in the office painted a glossy white and gold at the tips. i guess not so much "dipped", more like sprayed :)

so step 1, i taped off the tips 4" from the end. why i chose 4" i don't know, just felt right.


i picked up some rustoleum paint and primer in one with a really handy sprayer that doesn't end up making your pointer finger fall off!


here they are in white...


so then onto the gold part. easy right? well not exactly...i had also picked up a can of rustoleum gold spray paint and luckily decided to try it out first before spraying it on. TERRIBLE!! rookie mistake on picking out gold.


i mean that's not even gold. but god i love the internet and blogs. in a matter of seconds i was reading a great post at brittany makes who as it turns out is an accountant by day. love that!! anyway, she turned me on to montana gold spray paint which i quickly ordered (color is called goldchrome).


so taped them up again, this time from the other side and then used old plastic bags to cover the majority of the antlers - taping the whole thing seemed ridiculous.


then spray away. i found that the gold went on like butter and you really don't need to use much at all. i did find however that it look longer to dry than the white but that also could have been our insane heat when i was doing it! i brought them inside to dry in the a/c.


here is where my project takes a sad turn...i was bringing them in, trying to balance them while also trying not to step on a toddler and a dog when one went crashing to the floor. it was so sad :( but luckily it did not hit the precious toddler or dog. phew. however both antlers broke off and were damaged enough that i couldn't glue it back together and had to buy a replacement. fortunately ballard still carries these so a new one is on the way.

since i was so close to being finished and had already written up the majority of this post, i am posting it anyway (to save myself from having a complete hissy fit!!). please stay tuned for a full report when they are done and mounted. i am not a good diyer, i repeat, not good!!

May 28, 2013

Pantry Jar Decals

from house of smiths!! i had bookmarked these decals forever ago and just recently replaced my pantry jars with some from the container store - they were worthy of adding a decal! i wanted the canisters to be see through, have a wide opening, and have an air tight seal and these acrylic ones fit the bill. although now i kind of wish i got these glass ones. oh well.

they come in a set of 5 - salt and powdered sugar will have to wait :)


it was super easy to put these on. took me all of about 5 minutes. she suggests using a credit card or spatula to smooth out the decals - i used a wooden spoon and it worked perfectly. i got a little too confident by the time i got to the brown sugar which is a tad crooked. but here is a much better picture of the decals from shelly smith's, of house of smiths, own pantry!

May 6, 2013

Weekend Work

heyyyy.  how was your weekend? ours was fab minus a 4:30am wake up call saturday with a pukey toddler. poor charlie :( changed his sheets, our sheets, ran a load of laundry, and gave him a tub all before 6am! but it passed through quickly and no one else (knock on wood) caught it. but i wasn't actually going to talk about vomit today...

the mister and i decided to fill in some empty garden beds at our house this weekend. so during the boys' sunday nap time which was luckily quite long for some reason, we banged out 10 plants in 3 hours!

4 hostas. these will fill out to 2 feet wide but right now they look a little wimpy.


and 6 grasses. the one in the middle grows to 6 feet tall (if you let it) and the side ones get to about 3 feet tall.

(how embarrassing is our lawn (if you can even call it that)??


i was too much of a moron to take before shots but just imagine these beds with nothing in them. just dirt. not a very exciting "before." :) we are feeling very accomplished. there may have been a couple of high fives. now hopefully we will remember to water them!

November 28, 2011

Nursery Windows and DIY Tiebacks

the windows are done and i thought i'd share how they came out! the nursery is on the front side of the house, which is the really sunny side, and there are 4 windows that let in a lot of light. it's great to have such a sunny spot but also means that we need some major room darkening going on!

so each window got a white roman shade backed with blackout fabric and panels or a valance made out of the aqua bird fabric - the inspiration for the whole room!

window at right side of the room:


front window - one regret here - i assumed that the workroom would center a bird on each side of the valance but they didn't. i really wish i had asked them to do that. we all know what happens when one ASSumes.


two left side windows:


now for the diy part on the tiebacks above. i thought initially that i was going to use ribbon for the tiebacks on these windows so i didn't have tiebacks made but then decided that might be too girly. so i took a swatch of the fabric that i had and made the tiebacks myself! i don't have a sewing machine so this was a no-sew project (read: this was super easy).


i cut a piece out and used fabri-tac to glue down the sides for a nice, clean edge.


finished glueing down all the edges, making sure it was even. finished width ended up being 5.5" and length was 22".


i folded it down the center and glued the edges together. i wanted the double thickness to make it extra sturdy.


i repeated the same steps on the second one, making sure my measurements were the same. i wanted to get a bird in each one so if you are using a fabric with a large print, make sure you pay attention to how you cut the initial piece.


my husband hammered a nail through the end of each pieces to make little holes to slip through the hooks on the wall. this was the risky part - obviously the fabric can easily fray. we'll see how it holds up. a better alternative would be to sew rings to each end to avoid cutting the fabric but bed rest prevents quick trips out!

getting close to being done! last parts are figuring out the artwork and accessorizing. can't wait to share the finished product!

August 22, 2011

DIY Art: Clouds

i saw this post over at amber interiors a while ago and couldn't get it out of my mind. i have been literally thinking about cloud pictures for months. amber's photos:


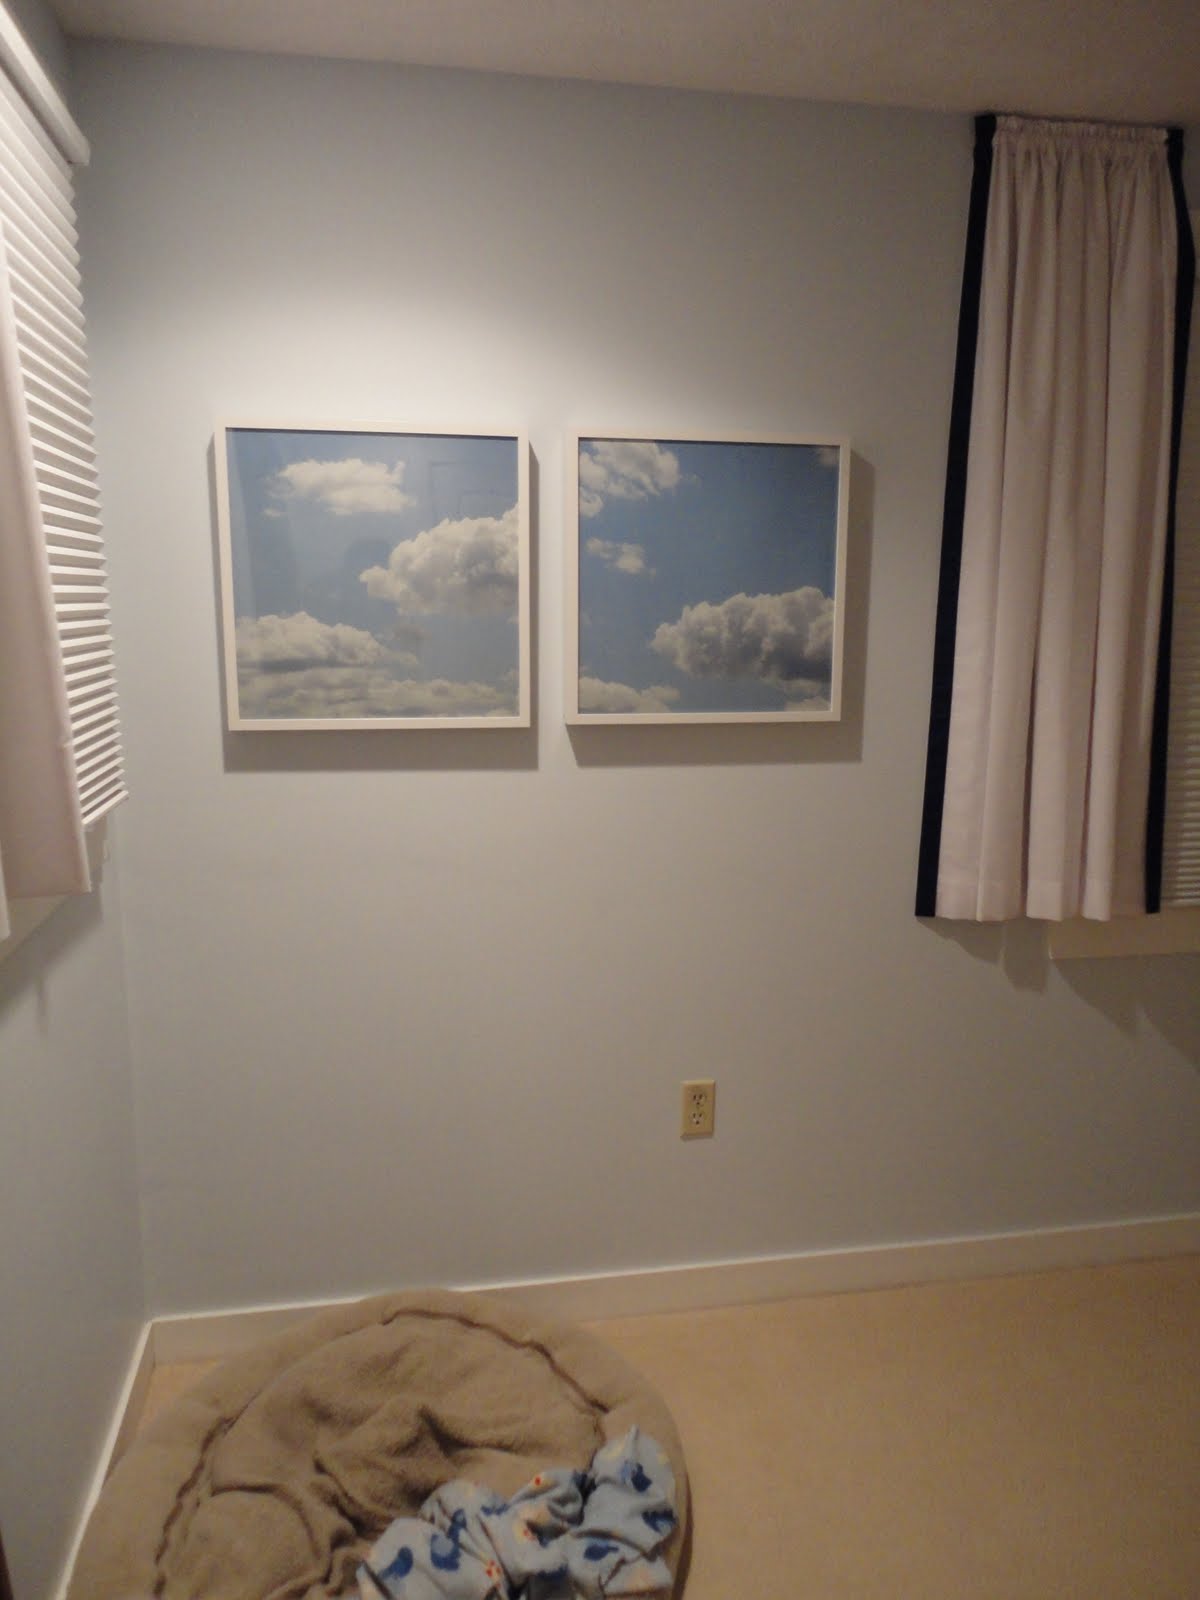
can i just tell you how hard it is to get photos of the perfect fluffy clouds? i must have taken at least 50 pictures to get two that i thought were frame-worthy. that probably says something about my picture-taking abilities. but one day i looked out the window at work and saw the prettiest clouds. i ran outside and started clicking - you never know!

so here are mine! i bought 20x20 ribba frames at ikea and blew up my photos at wizardprints.com. i ended up having to order them slightly larger and trim them down to fit the square frames. apologies for forgetting to take ANY pictures of the actual process!


the ikea glass is extremely reflective so it was hard getting clear pictures of the photos. also featured is lily the dog's bed and blankie. :)  oh one tip on cutting the photos - i went out and bought a new exacto knife, a cutter that claimed to cut plastic and a mat to cut on. in the end none of these fancy things worked as well as an old fashioned pair of scissors! so don't waste your money, plus the edges are hidden by the frame anyway!

June 27, 2011

DIY Bench Reupholstery

this weekend i got around to reupholstering the bench i got from ballard. this was my first go at upholstery and i'm pretty pleased with the results!

gathered the tools - staple gun, scissors, and pliers. my first thought was to remove the existing fabric with the needle nose pliers.


much harder said than done. the pliers were too thick, the staples were tiny, and i didn't want to damage the black lining. so quick change of plans, and making it much easier, i decided to put the new fabric right over the old one. it worked out since i was putting dark fabric over light but it might not have worked if it was the other way around.

i rolled out the piece of fabric and saw that it had an imperfection in the upper-middle of the piece. it's a little hard to tell but there were black marks on both of the pagodas which made it hard to center one particular scene.


i positioned the bench on the fabric so that the yucky part would be hidden in the back.


my trusty advisor was there to supervise (apparently standing was too much work so she needed to lean. note the back feet):


i began stapling the fabric at one end and carefully tucked in the corners so they were straight. almost like a present. before doing the other 3 sides i made sure the fabric was going to be straight on the other side.


finished stapling around (tip - pull the fabric very tight for a smooth finished look), screwed the legs back in and voila! my new bench was complete!


i would rate this project as easy, maybe even super easy, and i highly encourage anyone looking for a quick change to try something similar! 
Related Posts with Thumbnails
 

design + development by kelly christine studio